This is my printer.cfg code, it is a work in progress and should only be used for reference.
In reference to a comment on this video of mine: https://youtu.be/RvArwrJtTBM
# This file contains common pin mappings for the BigTreeTech Octopus.
# To use this config, the firmware should be compiled for the
# STM32F446 with a "32KiB bootloader" and a "12MHz crystal" clock reference.

# See docs/Config_Reference.md for a description of parameters.

[virtual_sdcard]
path: ~/gcode_files

[display_status]

[pause_resume]

[gcode_macro CANCEL_PRINT]
description: Cancel the actual running print
rename_existing: CANCEL_PRINT_BASE
gcode:
  TURN_OFF_HEATERS
  CANCEL_PRINT_BASE

# Driver0
[stepper_x]
step_pin: PF13
dir_pin: PF12
enable_pin: !PF14
microsteps: 16
rotation_distance: 80
endstop_pin: !PG6
position_endstop: 0
position_max: 330
homing_speed: 50

# Driver1
[stepper_y]
step_pin: PG0
dir_pin: PG1
enable_pin: !PF15
microsteps: 16
rotation_distance: 80
endstop_pin: !PG9
position_endstop: 0
position_max: 330
homing_speed: 50

# Driver2
[stepper_z]
step_pin: PF11
dir_pin: !PG3
enable_pin: !PG5
microsteps: 16
rotation_distance: 16
endstop_pin: probe:z_virtual_endstop
position_min: -15
position_max: 395


# Driver3
# The Octopus only has 4 heater outputs which leaves an extra stepper
# This can be used for a second Z stepper, dual_carriage, extruder co-stepper,
# or other accesory such as an MMU
[stepper_z1]
step_pin: PG4
dir_pin: !PC1
enable_pin: !PA0
microsteps: 16
rotation_distance: 16


#...

########################
#      BL Touch        #
########################

# A [probe] section can be defined instead with a pin: setting identical
# to the sensor_pin: for a bltouch
[bltouch]
sensor_pin: ^PB7
control_pin: PB6
x_offset: -42.3
y_offset: -7
z_offset: 5.1
speed: 5
pin_move_time: .68
stow_on_each_sample: False
pin_up_touch_mode_reports_triggered: False
samples: 3
samples_result: median

[safe_z_home]
home_xy_position: 210, 165 # Change coordinates to the center of your print bed
speed: 50
z_hop: 10                 # Move up 10mm
z_hop_speed: 5

########################
#      Z Tilt          #
########################

[z_tilt]
z_positions:-90,165
  420,165
points: 90,165
  327,165
speed: 200
horizontal_move_z: 10
retries: 5
retry_tolerance: .005


########################
#  Mesh Bed Leveling   #
########################

[bed_mesh]
speed: 200
horizontal_move_z: 6
mesh_min: 45, 45
mesh_max: 280, 280
probe_count: 5, 5

###########################
#  SCREWS_TILT_CALCULATE  #
###########################

[screws_tilt_adjust]
screw1: 90,45
screw1_name: left front
screw2: 90,285
screw2_name: left back
screw3: 330,285
screw3_name: right back
screw4: 330,45
screw4_name: right front
speed: 100
horizontal_move_z: 5
screw_thread: CCW-M3


########################
#      Extruder        #
########################

# Driver4
[extruder]
step_pin: PF9
dir_pin: !PF10
enable_pin: !PG2
microsteps: 16
rotation_distance: 30
nozzle_diameter: 0.400
filament_diameter: 1.750
heater_pin: PA2 # HE0
sensor_pin:  PF4 # T0
sensor_type: EPCOS 100K B57560G104F
control: pid
pid_Kp: 21.259
pid_Ki: .998
pid_Kd: 113.204
min_temp: 0
max_temp: 250

#[filament_switch_sensor material_0]
#switch_pin: PG12

# Driver5
#[extruder1]
#step_pin: PC13
#dir_pin: PF0
#enable_pin: !PF1
#heater_pin: PA3 # HE1
#sensor_pin: PF5 # T1
#...

#[filament_switch_sensor material_1]
#switch_pin: PG13

# Driver6
#[extruder2]
#step_pin: PE2
#dir_pin: PE3
#enable_pin: !PD4
#heater_pin: PB10 # HE2
#sensor_pin: PF6 # T2
#...

#[filament_switch_sensor material_2]
#switch_pin: PG14

# Driver7
#[extruder3]
#step_pin: PE6
#dir_pin: PA14
#enable_pin: !PE0
#heater_pin: PB11 # HE3
#sensor_pin: PF7 # T3
#...

#[filament_switch_sensor material_3]
#switch_pin: PG15

[heater_bed]
heater_pin: PA1
sensor_pin: PF3 # TB
sensor_type: ATC Semitec 104GT-2
#control: watermark
min_temp: 0
max_temp: 130

[fan]
pin: PA8

[heater_fan fan1]
pin: PE5

#[heater_fan fan2]
#pin: PD12

#[heater_fan fan3]
#pin: PD13

#[heater_fan fan4]
#pin: PD14

#[controller_fan fan5]
#pin: PD15

[mcu]
serial: /dev/serial/by-id/usb-Klipper_stm32f446xx_47005E000451373330333137-if00
# CAN bus is also available on this board

[printer]
kinematics: corexy
max_velocity: 300
max_accel: 3000
max_z_velocity: 5
max_z_accel: 100

########################################
# TMC2209 configuration
########################################

#[tmc2209 stepper_x]
#uart_pin: PC4
#diag_pin: PG6
#run_current: 0.800


#[tmc2209 stepper_y]
#uart_pin: PD11
#diag_pin: PG9
#run_current: 0.800


#[tmc2209 stepper_z]
#uart_pin: PC6
##diag_pin: PG10
#run_current: 0.650
#stealthchop_threshold: 999999

#[tmc2209 stepper_]
#uart_pin: PC7
##diag_pin: PG11
#run_current: 0.650
#stealthchop_threshold: 999999

[tmc2209 extruder]
uart_pin: PF2
run_current: 0.8
#stealthchop_threshold: 999999

#[tmc2209 extruder1]
#uart_pin: PE4
#run_current: 0.800
#stealthchop_threshold: 999999

#[tmc2209 extruder2]
#uart_pin: PE1
#run_current: 0.800
#stealthchop_threshold: 999999

#[tmc2209 extruder3]
#uart_pin: PD3
#run_current: 0.800
#stealthchop_threshold: 999999

########################################
# TMC2130 configuration
########################################

#[tmc2130 stepper_x]
#cs_pin: PC4
#spi_bus: spi1
##diag1_pin: PG6
#run_current: 0.800
#stealthchop_threshold: 999999

#[tmc2130 stepper_y]
#cs_pin: PD11
#spi_bus: spi1
##diag1_pin: PG9
#run_current: 0.800
#stealthchop_threshold: 999999

#[tmc2130 stepper_z]
#cs_pin: PC6
#spi_bus: spi1
##diag1_pin: PG10
#run_current: 0.650
#stealthchop_threshold: 999999

#[tmc2130 stepper_]
#cs_pin: PC7
#spi_bus: spi1
##diag1_pin: PG11
#run_current: 0.800
#stealthchop_threshold: 999999

#[tmc2130 extruder]
#cs_pin: PF2
#spi_bus: spi1
#run_current: 0.800
#stealthchop_threshold: 999999

#[tmc2130 extruder1]
#cs_pin: PE4
#spi_bus: spi1
#run_current: 0.800
#stealthchop_threshold: 999999

#[tmc2130 extruder2]
#cs_pin: PE1
#spi_bus: spi1
#run_current: 0.800
#stealthchop_threshold: 999999

#[tmc2130 extruder3]
#cs_pin: PD3
#spi_bus: spi1
#run_current: 0.800
#stealthchop_threshold: 999999

[board_pins]
aliases:
    # EXP1 header
    EXP1_1=PE8, EXP1_2=PE7,
    EXP1_3=PE9, EXP1_4=PE10,
    EXP1_5=PE12, EXP1_6=PE13,    # Slot in the socket on this side
    EXP1_7=PE14, EXP1_8=PE15,
    EXP1_9=<GND>, EXP1_10=<5V>,

    # EXP2 header
    EXP2_1=PA6, EXP2_2=PA5,
    EXP2_3=PB1, EXP2_4=PA4,
    EXP2_5=PB2, EXP2_6=PA7,      # Slot in the socket on this side
    EXP2_7=PC15, EXP2_8=<RST>,
    EXP2_9=<GND>, EXP2_10=PC5

# See the sample-lcd.cfg file for definitions of common LCD displays.


#[neopixel my_neopixel]
#pin: PB0

#*# <---------------------- SAVE_CONFIG ---------------------->
#*# DO NOT EDIT THIS BLOCK OR BELOW. The contents are auto-generated.
#*#
#*# [bed_mesh default]
#*# version = 1
#*# points =
#*# 	  -0.149688, -0.099688, -0.069688, -0.074688, -0.079688
#*# 	  -0.059688, -0.004688, 0.055312, 0.050312, -0.009688
#*# 	  0.005312, 0.050312, 0.070312, 0.050312, 0.010312
#*# 	  0.000312, 0.035312, 0.055312, 0.030312, -0.024688
#*# 	  -0.069688, -0.039688, -0.014688, -0.044688, -0.089688
#*# tension = 0.2
#*# min_x = 45.0
#*# algo = lagrange
#*# y_count = 5
#*# mesh_y_pps = 2
#*# min_y = 45.0
#*# x_count = 5
#*# max_y = 280.0
#*# mesh_x_pps = 2
#*# max_x = 280.0
#*#
#*# [extruder]
#*#
#*# [heater_bed]
#*# control = pid
#*# pid_kp = 71.202
#*# pid_ki = 1.276
#*# pid_kd = 993.275
#*#
#*# [bltouch]


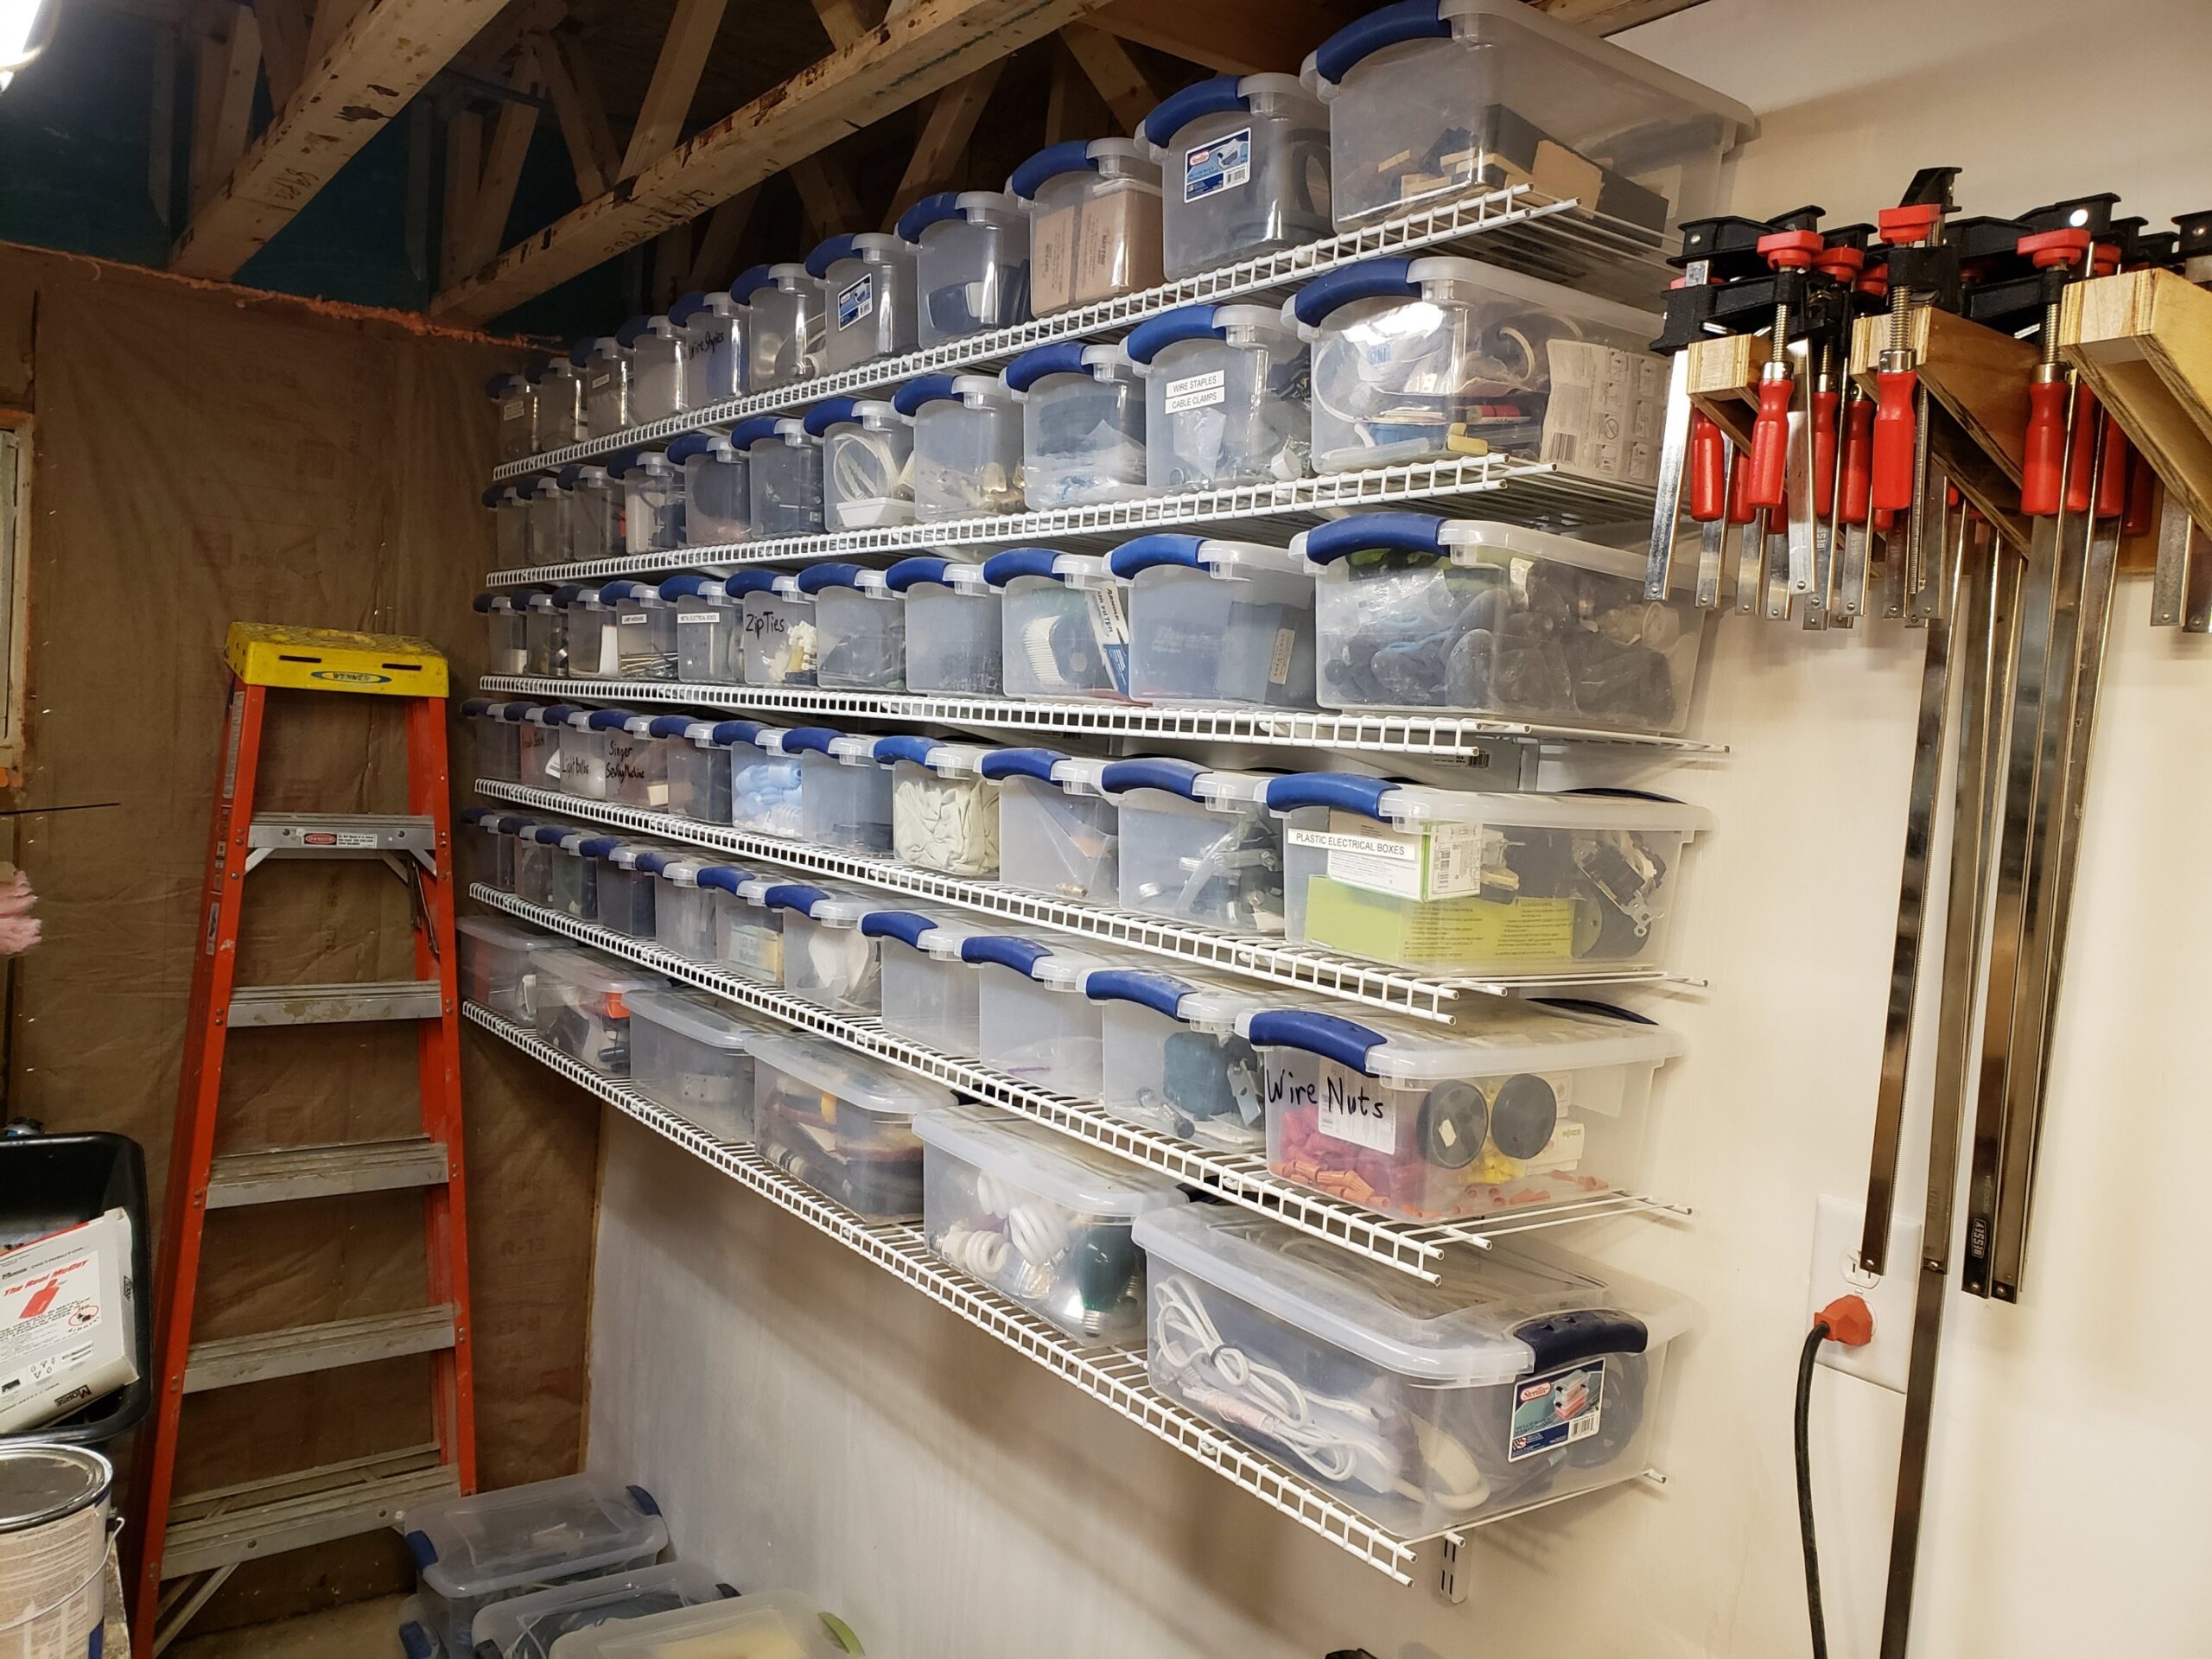
 This is what storage in my shop looks like usually. I’m using an old merchandise shelf from our hospital that’s 24 inches deep and I’ve decided to use sterilite tubs that are about 12 inches deep (7 quart) as my standard small sized storage format and the merchandise shelving is just not working. It takes up too much floor space and I always seem to stack things in front of the boxes because it’s a flat surface and you know what flat surfaces collect… things.First I tried building a wall hangable cubby design out of plywood, the time costs were high and reusability low. It also consumes more plywood than you would expect.
 Then I decided to use shelves instead, for time and money reasons. First I thought to just use utility shelving boards at Lowes, they come in 11.5″x8′ boards. Barely deep enough if even. I would still need to buy shelf brackets, and enough to prevent sagging, probably 4 per 8 foot board.Then I wandered over to the shelving section to look at shelf brackets and having used ClosetMaid stuff before I figured while I was in the isle I would check it out. While the dollar cost might be a bit higher the other factors would win out. I was able to use a horizontal hanger rail and have to level it only once and then use vertical hanging brackets hooked into the horizontal rod.
 So I’ve decided to dive into the ClosetMaid system of organization for my standard small sterilite tubs and this is what I’ve come up with. I did bed to spend some time spanning everything out to be perfect but it just works.
 Thosethose are 8ft racks and there’s 11 tubs per rack so I can fit 33 as you see in the picture, I spaced the vertical uprights so that there would be one tub on the end and units of 3 tubs in between each upright.
 I bought all of the eight foot sections that Lowes had so that’s what I was able to put up.I’ll get more 8 foot sections and shelf brackets for the rest of my tubs. I imagine I need about three more shelves for the small tubs that I have a bunch of and I will use a deeper 18″ ClosetMaid shelf for my medium sized 15 quart sterilite containers.I still have these to sort:

 And a few more scattered about.No I’m not sponsored by ClosetMaid, but if they want to help out I wouldn’t turn it down. This stuff is expensive.